Where Are B12 Injections Administered How to Give B12 Injections at Home to Yourself · PA Relief
Introduction
If you’ve ever wondered where are B12 injections administered—and whether you can do it safely at home—you’re not alone. In my hands-on work helping patients prepare for self-administration, the biggest fear I hear isn’t “needle anxiety.” It’s uncertainty: choosing the correct site, avoiding nerves and blood vessels, and following a technique that’s repeatable and clean.
This guide walks you through where B12 injections are administered, how to position yourself, how to prepare the medication and supplies, and what a safe self-injection process looks like. You’ll also get practical tips I’ve used to reduce missed doses, minimize discomfort, and keep the process consistent.
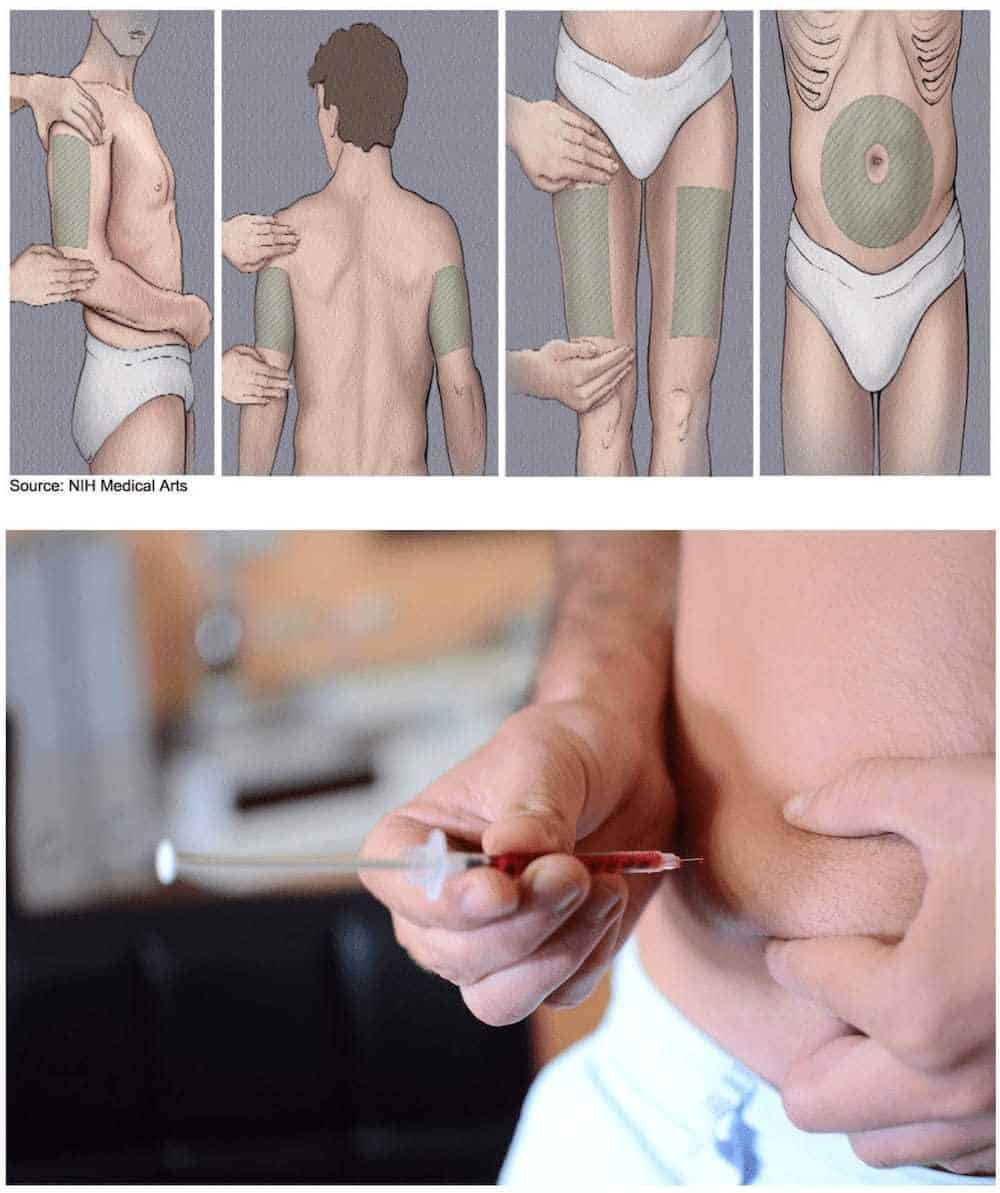
Where Are B12 Injections Administered? (Common Injection Sites)
In most home self-injection plans for vitamin B12 (often cyanocobalamin or hydroxocobalamin), the two most commonly used injection sites are the thigh and the upper arm (deltoid). Some regimens also use the buttock (dorsogluteal or ventrogluteal area), but this site is harder for many people to self-administer safely because of angle, depth, and locating the correct landmark.
1) Thigh (Vastus Lateralis)
This is often the easiest site for self-injection. I’ve seen many people achieve more consistent dosing here because it’s visible and accessible while standing or sitting.
- Why it works: Large muscle mass supports proper intramuscular delivery.
- What to watch: Avoid injecting too high toward the hip crease; choose the outer, mid-thigh area.
- Best practice: Keep the muscle relaxed so the tissue “gives” during insertion.
2) Upper Arm (Deltoid)
The deltoid is another commonly taught site, especially when caregivers aren’t involved and the dose is appropriate for that muscle.
- Why it works: The deltoid is a reachable intramuscular target for many adults.
- What to watch: If you don’t have enough muscle bulk, you may struggle with consistent depth.
- Best practice: Support your arm so it doesn’t tense up.
3) Buttock/Gluteal Region (Only if your clinician specifically instructs it)
Some prescriptions and education materials describe gluteal injection sites. In my experience, people can do it, but only when the landmarks are taught clearly and you’re confident about positioning.
- Why it works: The gluteal region has substantial muscle.
- What to watch: Landmark errors increase risk of hitting the wrong tissue.
- Best practice: Use the exact site your prescriber demonstrated—don’t “eyeball” the location.
Image reference (injection site landmarks):
How to Decide Which Site You Should Use
Even when you know the standard answer to where are B12 injections administered, the right site for you depends on the specific product, your body mechanics, and your training. I recommend you treat your clinician’s instructions as the “source of truth” and confirm these basics before your first home dose:
- Route: Many B12 home injections are intramuscular (IM). If your plan is different (e.g., subcutaneous), the sites and technique can differ.
- Dose volume: Larger volumes may be better tolerated in specific muscles.
- Body habitus: Muscle thickness and how easy it is to reach the correct landmark matters.
- Injection frequency: Rotating sites can help reduce local soreness for repeat dosing.
- Your comfort and precision: Self-injection should be something you can do reliably without improvising.
Step-by-Step: A Safe Home Self-Injection Workflow (IM)
The goal isn’t just to “get it in.” In my hands-on patient training, the biggest improvements in comfort and confidence come from following a consistent workflow every time—especially around cleaning, positioning, and needle handling.
Before you start
- Wash your hands thoroughly.
- Gather supplies on a clean surface: the B12 medication, syringe/needle (or what your prescription kit provides), alcohol swabs, gauze/cotton, and a sharps container.
- Check the medication label for drug name, concentration, and your prescribed dose.
- Confirm whether the medication should be gently rolled/swapped as instructed (some formulations require specific handling; others do not).
Positioning (reduce muscle tension)
- Thigh: Sit or stand with your knee slightly relaxed; aim for a comfortable, stable position where you can clearly see the target area.
- Upper arm: Keep the arm relaxed, supported if needed, so the deltoid muscle isn’t bracing.
- Gluteal (if instructed): Use the exact landmark technique taught to you; consider having a clinician observe your first attempt.
Choose and clean the injection site
- Use an alcohol swab and clean in a circular motion from the center outward.
- Allow the site to dry (don’t blow on it or fan it).
Inject with controlled technique
- Use steady, confident motion to insert the needle into the muscle at the angle your training specifies for IM injection.
- Administer the medication at a pace you can control.
- Withdraw the needle carefully.
- Apply gentle pressure with gauze if needed.
After the injection
- Dispose of the needle and syringe immediately into a sharps container.
- Don’t recap needles.
- Monitor the site for typical minor soreness for a short period.
- Record the date/time and site used if your clinician wants tracking (helpful for rotation).
Common Mistakes I See (and How to Avoid Them)
These are the errors that, in my experience, most often cause pain, missed dosing confidence, or “I’m not sure I hit the right place” anxiety.
1) Unclear landmarking
If you can’t confidently locate the correct area, you don’t yet have the repeatability required for home injection. For many people, thigh or deltoid are easier to landmark than the gluteal region.
2) Injecting into a tense muscle
Tension can make the insertion feel sharper. Before you start, take a breath and relax the target area.
3) Skipping the drying step
Injecting before the alcohol has dried can increase sting and may contribute to local irritation.
4) Inconsistent site rotation
For repeated dosing, I typically encourage rotation between left/right and between sites if your plan allows—this can reduce repeated soreness in one exact location.
What “Normal” vs “Concerning” Looks Like
A little soreness, mild redness, or a small tender spot for a short time is common after IM injections. However, certain symptoms should prompt contact with your clinician.
- Generally common: mild tenderness, slight bruising, short-lived redness.
- Contact your clinician: worsening pain, rapidly spreading redness, persistent swelling, fever, pus-like drainage, or symptoms that feel out of proportion.
- Seek urgent care: severe allergic-type reactions (e.g., trouble breathing, widespread hives).
FAQ
Where are B12 injections administered for self-injection?
For home self-administration, the most commonly used sites are the thigh (vastus lateralis) and the upper arm (deltoid). Some plans use the gluteal region, but that site is harder to self-locate and should be used only if your clinician specifically instructs it.
Is it better to inject into the thigh or the upper arm?
In practice, the “better” site is the one you can locate consistently with relaxed muscles and correct technique. Many people find the thigh easier for accuracy because it’s highly visible and accessible.
What should I do if I accidentally choose the wrong spot?
If you’re unsure where the needle went, stop and contact your clinician or injection nurse for guidance—especially before your next dose. For future attempts, ask for a hands-on demonstration or supervised practice so the landmarking feels certain.
Conclusion
Knowing where are B12 injections administered is the foundation, but safe self-injection also depends on landmark accuracy, muscle relaxation, clean technique, and a repeatable workflow. In my experience, most people do best starting with the sites they can reliably target—commonly the thigh or deltoid—and only using other sites if they’ve been clearly taught.
Next step: Ask your clinician (or injection nurse) to confirm your exact injection site and landmarking for your specific B12 product, and request a supervised first dose so you can carry out the routine confidently at home.
Discussion